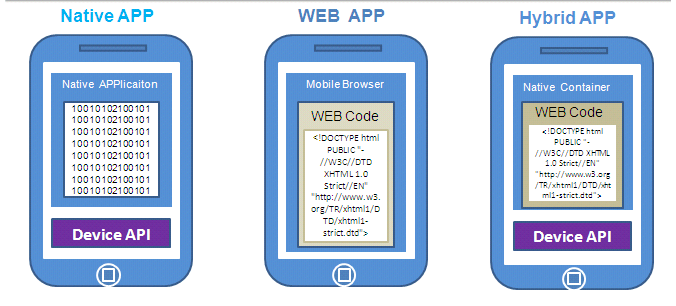
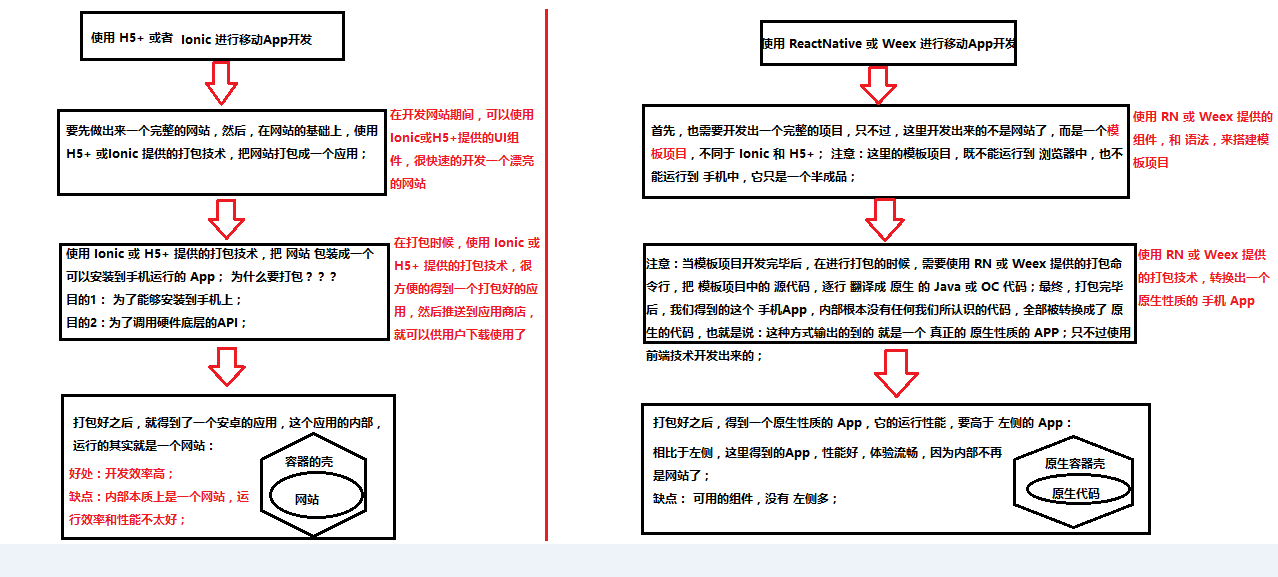
1. Angular
Angular、React、Vue并称前端三大框架。
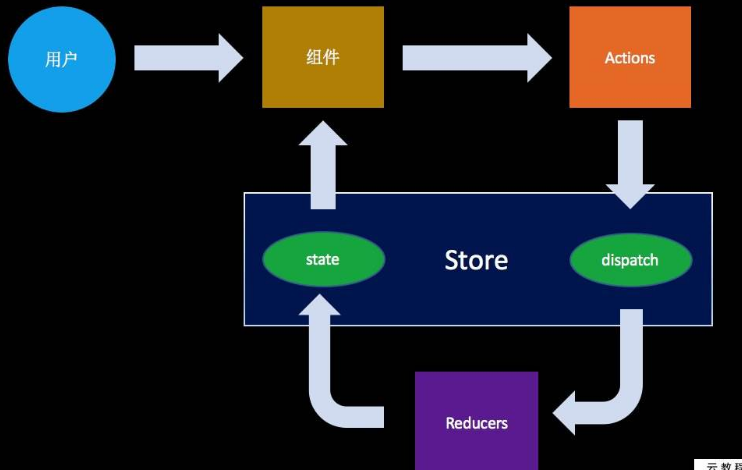
Vue 数据变动 —>页面变动 : 数据劫持+发布订阅模式
React 数据变动 –>页面变动 : setDate() 触发forceUpate
Angular 数据变动 –>页面变动 : 脏检查
2. Angular脚手架的使用
1 | 1.确保本地环境 node\python |
3. 组件的创建
1 | ng generate component foo |
4. 插值表达式
1 | <p>login works!</p> |
5. 常用指令
1 | <!--1.通过ngFor来遍历数组,可以通过let i=index来获取数组中的序号--> |
6. 自定义指令
当angular给我们提供的指令不够用的时候,不能满足我们需求的时候就需要自定义指令了。
1 | ng generate directive highlight |
7 事件处理
1 | <!--- |
8. 双向绑定
1 | 1. 需要在app.module.ts文件中引入FormsModule |
9.class和style的绑定
1 | <!--1.样式的绑定--> |
10. 过滤器的使用
1 | //Angular内置的一些过滤器 |
11. 自定义过滤器
1 | 1. 使用如下命令生成一个过滤器 |
1 |
1 |
1 |
12. 路由的使用
1 | 1. 在app.module.ts文件中引入路由模块 |
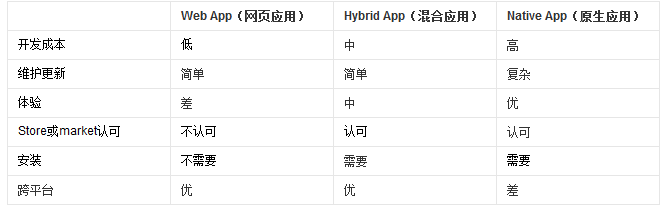
13. http服务的使用步骤
服务就是针对某个单一或系统功能的封装,Angular中典型的服务有http服务和日志服务
1 | 1. 在app.module.ts文件中引入HttpClientModule,并且加入到imports里面 |
14. TS变量的声明
1 | let nickname: string = '张三'; |
15. TS元组类型
元组类型允许表示一个已知元素数量和类型的数组,各元素的类型不必相同
1 | let x: [ number,string]; |
16. Any类型
1 | //any类型 |
17. Void类型
1 | //void类型 : 没有返回值,此时会返回undefined |
18. 展开运算符和解构赋值
1 |
|
19. 函数类型
1 | //1.函数声明:function 函数名字(参数1,参数2,参数3):函数返回值{函数体} |
20.类和继承和成员变量修饰符
1 | //基本示例 |
21. set和get方法
1 |
|
22. 静态变量和静态方法
1 |
|