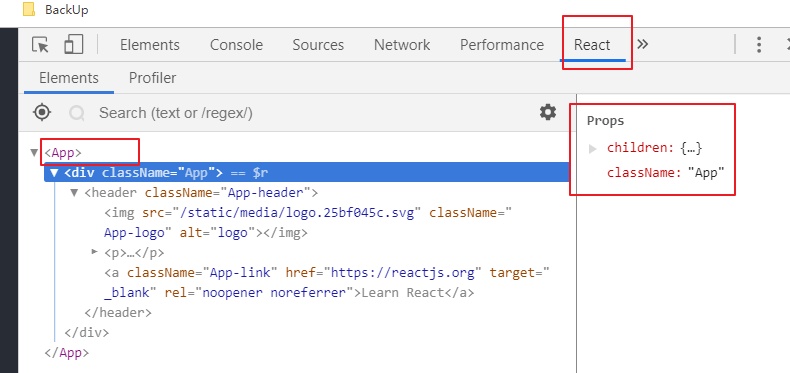
1. React dev tools
将资料中的react-developer-tools-3.6.0 拖入到浏览器的扩展程序中
2. creat-react-app创建项目
1 | # 全局安装 |
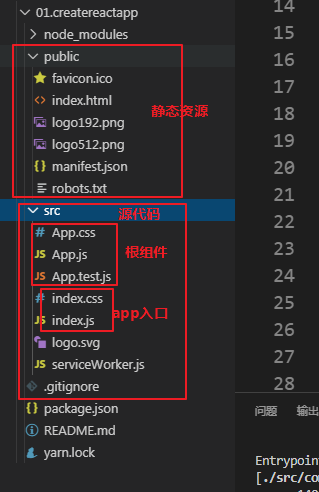
1 | # react-scripts主要设计原理是将配置好的如 `Webpack,Babel,ESLint` ,合并到 `react-scripts` 这npm包中,用户就可以开箱即用 |
3. creat-react-app基本配置
开启模块化 :
只要给文件名命名为 xx.module.css xx.module.scss xx.module.less
开启sass:
1
yarn add node-sass
然后创建button.scss或者button.module.scss,此时就可以使用scss文件了
在scss文件中引入其他文件
~代表nodel_modules
1
2@import '../styles/common.scss';
@import '~bootstrap/dist/css/bootstrap.css';开启less
Yarn add less less-loader
修改webpack.config.js
1
2
3
4
5
6
7
8
9
10
11
12
13
14
15
16
17
18
19
20
21
22
23
24
25
26
27
28
29
30
31
32
33
34
35//找到如下代码
const cssRegex = /\.css$/;
const cssModuleRegex = /\.module\.css$/;
//修改为如下代码
const cssRegex = /\.(css|less)$/;
const cssModuleRegex = /\.module\.(css|less)$/;
//找到这段代码
test: cssRegex,
exclude: cssModuleRegex,
use: getStyleLoaders({
importLoaders: 1,
sourceMap: isEnvProduction && shouldUseSourceMap,
}),
// Don't consider CSS imports dead code even if the
// containing package claims to have no side effects.
// Remove this when webpack adds a warning or an error for this.
// See https://github.com/webpack/webpack/issues/6571
sideEffects: true
//修改为如下代码
test: cssRegex,
exclude: cssModuleRegex,
use: getStyleLoaders({
importLoaders: 2,
sourceMap: isEnvProduction && shouldUseSourceMap,
},
'less-loader'
),
// Don't consider CSS imports dead code even if the
// containing package claims to have no side effects.
// Remove this when webpack adds a warning or an error for this.
// See https://github.com/webpack/webpack/issues/6571
sideEffects: true,配置@路径
修改webpack.config.js:
1
2
3
4
5
6
7
8
9
10
11
12alias: {
// Support React Native Web
// https://www.smashingmagazine.com/2016/08/a-glimpse-into-the-future-with-react-native-for-web/
'react-native': 'react-native-web',
// Allows for better profiling with ReactDevTools
...(isEnvProductionProfile && {
'react-dom$': 'react-dom/profiling',
'scheduler/tracing': 'scheduler/tracing-profiling',
}),
...(modules.webpackAliases || {}),
'@':path.join(__dirname, '..', "src") ★
},环境变量的使用
在项目根目录下创建.env文件,去写环境变量。注意:如果是自定义环境变量,需要以REACT_APP_开头
1
2REACT_APP_WEBSITE_NAME=myapp
REACT_APP_PUBLIC_URL=localhost:3000使用环境变量
1
2
3
4
5
6
7
8
9//在js代码中使用环境变量
if (process.env.NODE_ENV !== 'production') {
console.log("development")
}
{/*在组件中使用环境变量*/}
<small>You are running this application in <b>{process.env.NODE_ENV}</b> mode.</small>
<input type="text" defaultValue={process.env.REACT_APP_WEBSITE_NAME} />
<!--在html页面中使用环境变量-->
<title>%REACT_APP_WEBSITE_NAME%</title>
图片的使用
在属性或者行业样式中使用图片
1
2import Logo from './assets/jjf.jpeg'
<img src={Logo} alt="Logo" />;在css样式中使用图片 不需要引入,可以直接使用
1
2
3
4
5
6.logoDiv{
width: 100px;
height: 100px;
background-image: url('./assets/jjf.jpeg');
background-position: center;
}
字体图标的使用
npm install font-awesome
引入样式
1
import 'font-awesome/css/font-awesome.css'
使用样式
具体使用参照官网:http://www.fontawesome.com.cn/faicons/
1
<i class="fa fa-address-book" aria-hidden="true"></i>
reactstrap的使用
reactstrap:是一个基于boostrap的react组件库
yarn add reactstrap [bootstrap@4.0.0]
1
2
3
4
5
6
7import 'bootstrap/dist/css/bootstrap.css';
import { Alert } from 'reactstrap';
{/*使用reactstrap组件 */}
<Alert color="primary">
This is a primary alert — check it out!
</Alert>
4. AntDesign的使用
安装
1
yarn add antd
按需加载
a. yarn add babel-plugin-import –dev
b. 修改webpack.config.dev.js,将babelrc改成true
c. 删除package.json中babel的配置
d. 在项目根目录下创建一个 .babelrc文件
1
2
3
4
5
6
7
8
9
10
11
12
13
14{
"presets": [
"react-app"
],
"plugins": [
[
"import",
{
"libraryName": "antd",
"style": "css"
}
]
]
}使用antd
1
import { DatePicker } from 'antd';
然后在页面中使用对应的组件就可以了